
Please be aware that Lyyti is developed constantly and your view might not match 100% with the view described in this article.
The old saying "learn by doing" is also accurate with Lyyti. With these step-by-step instructions you'll create your first event and learn what are the factors affecting the event. At the end of each section, you'll find a link for more detailed instructions.
Use this article also later on as a basic structure for events!
This article contains the following sections:
- Fill in event information
- Define event settings
- Create registration page
- Thank the participant for registering
- Send a clear confirmation
- Automated waiting list
- What the registration looks like
- What next
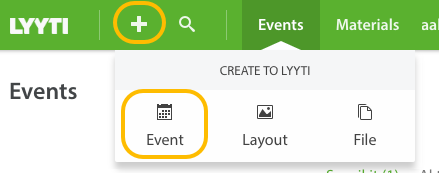
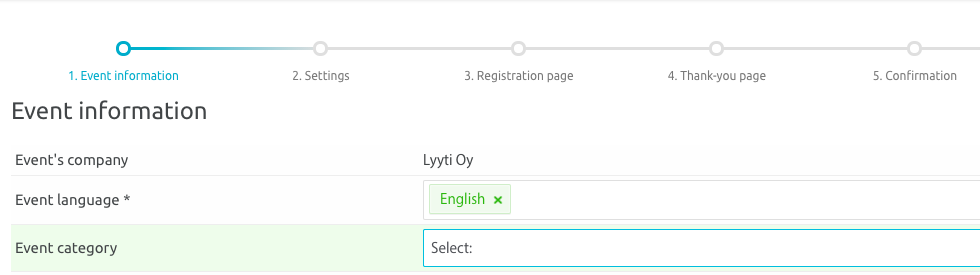
Start by clicking the + sign, then Create to Lyyti: Event in the menu up top. Select the event's language(s) and event category. You don't have to select any categories - it may also be that your organisation doesn't have event categories yet.
Select the event's language(s) and event category. You don't have to select any categories - it may also be that your organisation doesn't have event categories yet, or they're not included to your organisation's licence pack. Event categories are included in Professional and Enterprise packs.
Here is a short video of how to start creating your event:
Here you can find a larger version of the video.
1) Fill in event information
Enter the event name and other event information. By default, this information is shown to the participant both on the registration page and confirmation message, so please be clear with the information.
Basic information
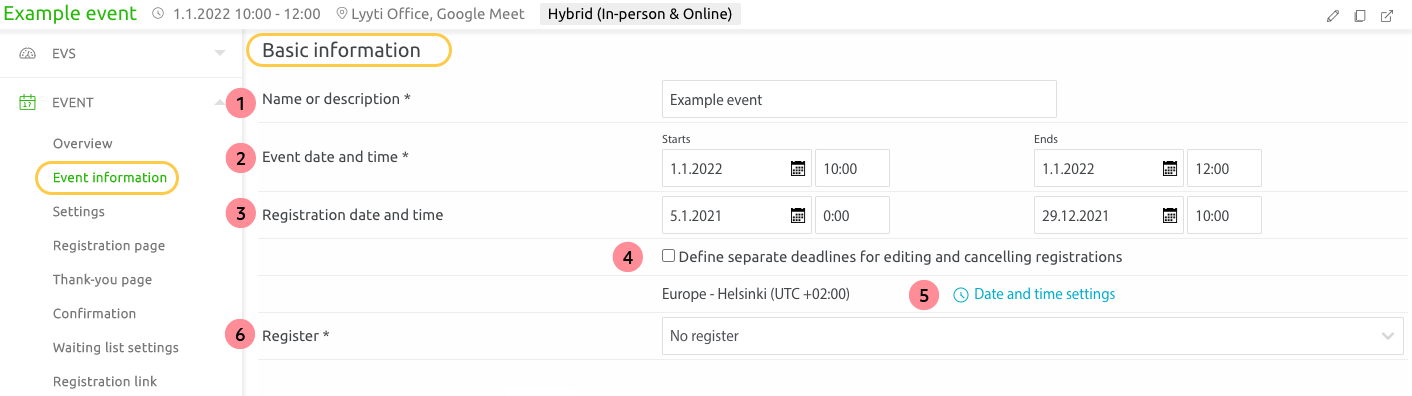
- Give a clear name or description to the event so the participant understands which event this is. Therefore, use e.g. "Lyyti seminar" instead of "Invitation to Lyyti seminar".
- Time of the event: Enter the actual date of the event, both beginning and end dates and times. The event's calendar note is created based on this information.
Events are archived seven days after their end date, after which the event itself and its participant information cannot be modified. It is possible to restore events from archive in order to edit them. - Time of registration
- Registration starts: Registration opens automatically when the event is created. However, since Lyyti doesn't publish the event nor can it be found by any search engines, it is safe to let registration start right away (please consider your organisation's settings, for example automatic calendars that may show the event on a website if linked with Lyyti).
If the registration is not scheduled to start at a certain time, it is open immediately after the event has been created. However, participants cannot register unless you invite them or publish the open link to the registration somewhere. - Registration closes: Determines the closing date and time of the registration. All registrations, modifications and cancellations must be done before this. After that the organiser is the only one who can register new participants or modify participant information.
- Registration starts: Registration opens automatically when the event is created. However, since Lyyti doesn't publish the event nor can it be found by any search engines, it is safe to let registration start right away (please consider your organisation's settings, for example automatic calendars that may show the event on a website if linked with Lyyti).
- Deadlines for editing and cancelling registration: By default, participants can edit or cancel their participation until the last registration date. However, you can define separate deadlines for editing and cancelling by clicking Define separate deadlines. Typically, registration closes about a week before the actual event, but cancellations are allowed until a day before the event, depending on the event.
- In Date and time settings you can define what date and time formats are in use and if the event's time zone is shown on the registration form.
- Register: When collecting participant data, the data becomes a person register. Your organisation's Lyyti admin user has added (or needs to add) your organisation's privacy policy into Lyyti, and participants need to accept it in order to register. The privacy policy explains how you process participant data. Read more about data protection questions.
Location
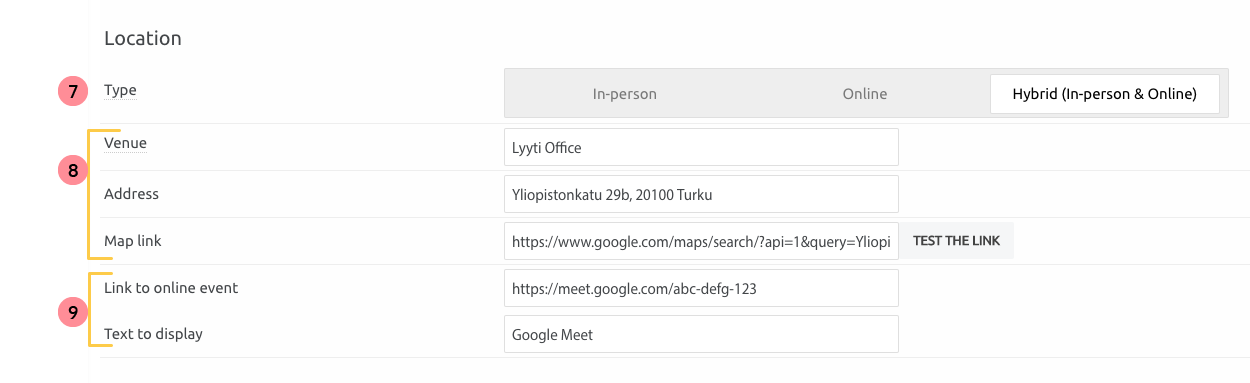
- With Lyyti you can create events that take place in-person, online or are hybrid events
- If your event is in-person or hybrid, you can give a name for the venue, address and generate a map link
- If your event is online, give a link to the online event. Participants will have their personal online link in their calendar note and confirmation message, and this personal online link will lead to this address via Lyyti's landing page. Read more about online event function here.
Additional information
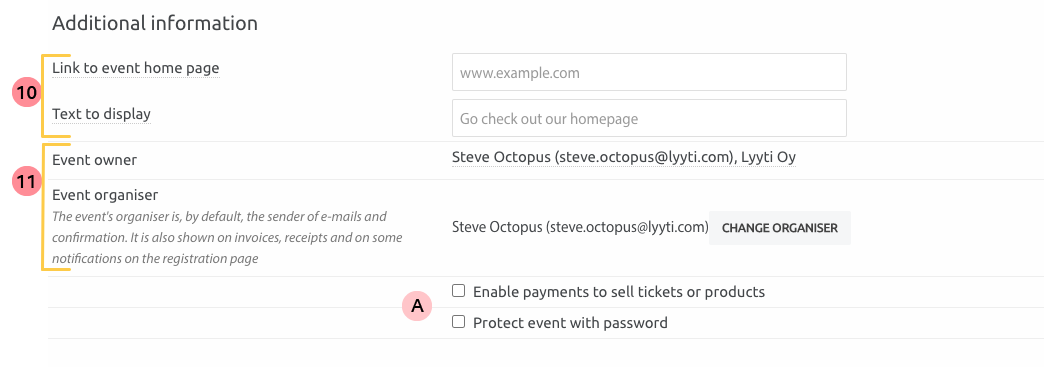
- If your event has a home page, you can link it to event information. Give the home page link also a text to display.
- Event owner and Event organiser:
The event owner is indicated by their name and e-mail address.They are the only one that can share rights for the event. This information is not shown to the participants, if you change the event organiser.
Event organiser's name and e-mail address will be visible to participants in their confirmation message, where they will be shown both as sender and as event organiser. The event organiser also the default sender of general e-mails and is shown on receipts, invoices and some notifications on the registration page.
If you change the event organiser, change both the name and e-mail. If one of the fields is left empty, Lyyti will use the event owner's information. Please note that you can only use addresses where the domains have been verified into Lyyti (click to read more about domain verification).
A) Last you can choose if you event will chargeable and if it will be protected by a password
- To sell products or tickets via Lyyti, tick Enable payments.
- More instructions on chargeable events can be found here.
Payment features are not automatically included in your license: please contact our customer service if you wish to use payments through Lyyti.
- Protect registration page with password: Yes: Opening the registration page and confirmation message's web versions (eg. pdf version) will require a password. Opening the confirmation in the e-mail client does not require a password.
- Hide your event from search engine results. This means that search engines shouldn't find your event's open registration link. However, not all search engines act accordingly and unfortunately we cannot affect to that. This affects also to Event websites if you're using one.
N.B. Personal registration links are always hidden from search engine results.
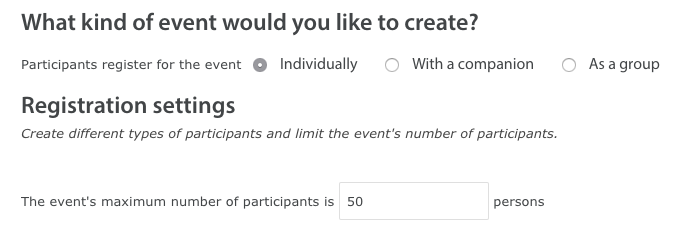
2) Define event settings

On the Settings page you define the basic functions for the event. How do the participants register, individually or can they bring a companion? What is the maximum number of participant in the event?
If you are still learning how to use Lyyti, select that registrations are done individually. In addition, add how many participants can participate.
When you're ready, click Next at the top of the page. The Next and Previous buttons also work as saving buttons.

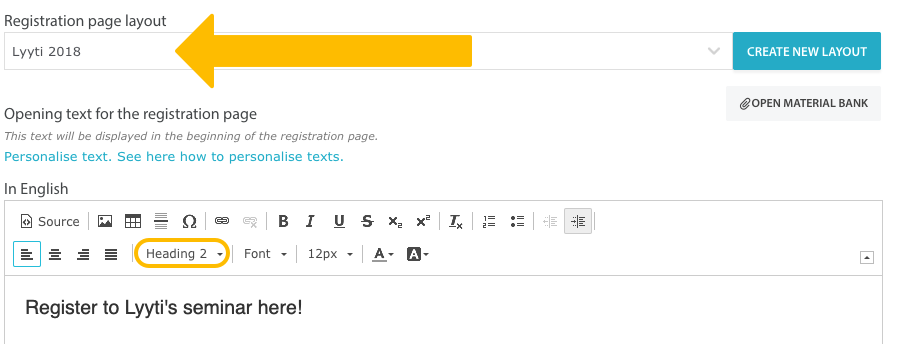
3) Create registration page

The registration page you create the actual registration form, select what images to show there and what questions to ask registrants.
First, select a registration page layout, which would be the top & bottom banners. You can select any layout added to your Lyyti account (learn more about layouts).
Then, add an opening text. Please note that this is not the invitation but a registration page that participants fill in after receiving the invitation. Therefore, write for example "Registration to (event name)". Remember to modify the text e.g. with headers.
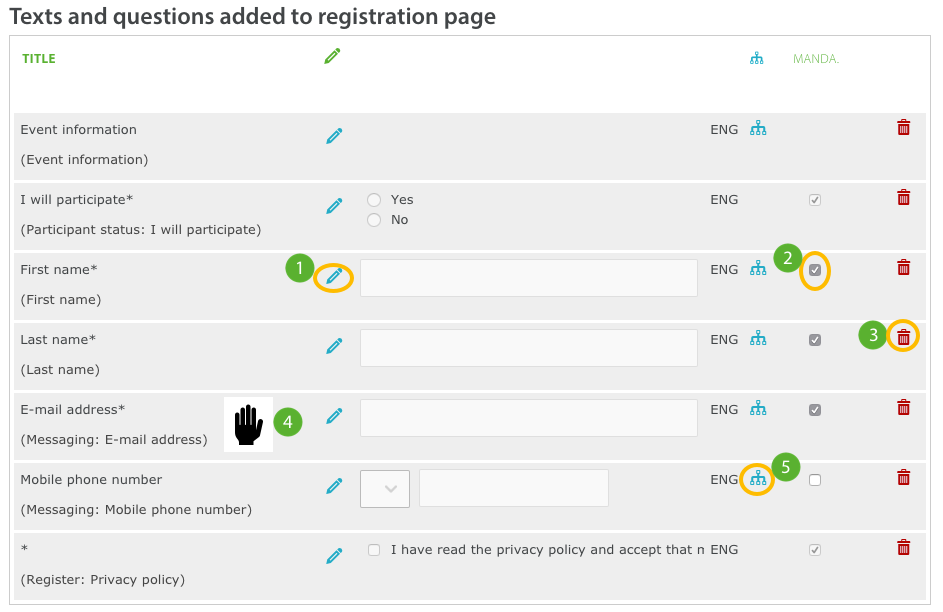
Lyyti has automatically created questions related to the registrant. Add your own questions by selecting a new question type:
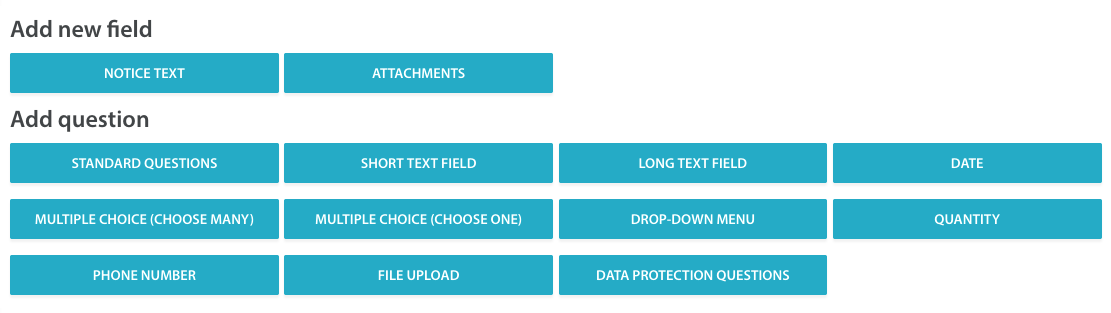
You can choose between text field that participants can answer freely to (e.g. job title), multiple choice questions (participants can choose many or only one of the given options, e.g. will you take part in the dinner: yes/no) and file upload to allow registrants to upload attachments (e.g. CV for recruitment).
Learn more about question types: multiple choice, text field, Quantity, Date, File upload
With every question you have the possibility to:
1) Edit the question by clicking the pen icon
2) Define if the question is mandatory
3) Delete question (if there are no answers given)
4) Move the question by drag&drop (if there are no conditions added)
5) Create a condition, i.e. a rule determining when and to whom the question is shown
When you're ready, click Next at the top of the page.
Learn more about how to build the registration page.
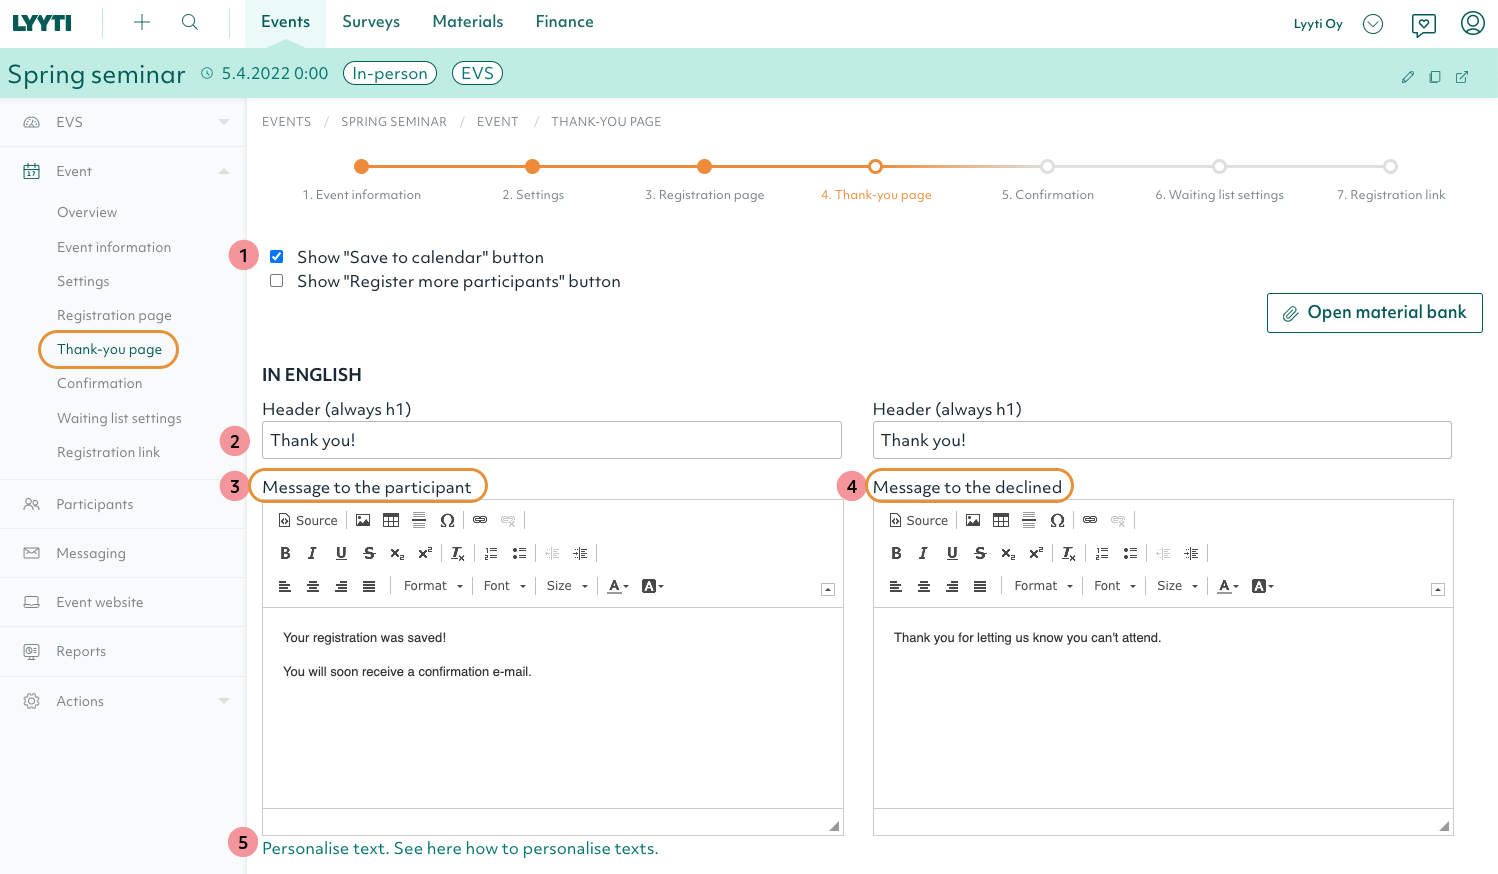
4) Thank the participant for registering

The thank-you page is the last page of the registration process visible on the browser. Please keep the page simple since participant spend only a brief moment on this page and will not return to it.
The most important function of the thank-you page is to let the participant know their registration succeeded and that they can save the event into their calendar. You can also let them know that they will receive a confirmation e-mail shortly.
There is al separate thank-you note for the declined / cancelling participant. Pease make sure that this message is also clear to them.
Learn more about the thank-you page
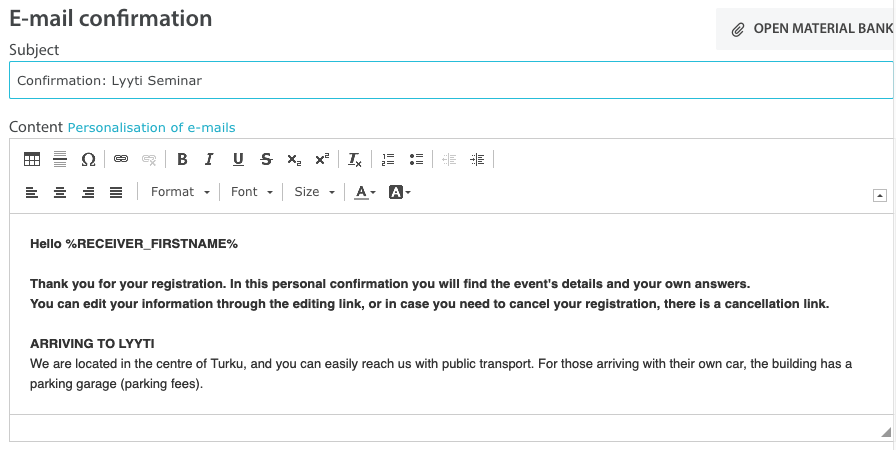
5) Send a clear confirmation

Lyyti's confirmation is an e-mail sent automatically to participants after registration. This e-mail is the correct place to include all the important information participants should know before arriving at the venue.
Tell the participant:
- Who to contact for more information
- How to arrive
- Dresscode
- What to bring
- How to prepare
- How to edit their registration
- How to cancel their registration
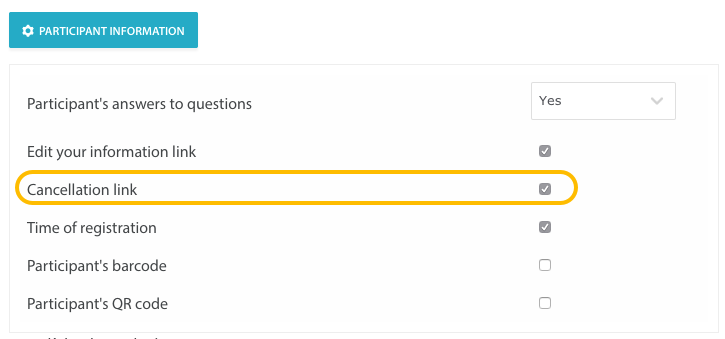
Participants can edit their information or cancel participation via Lyyti. To enable this, include the Edit your information and Cancellation links in the confirmation by clicking Show in confirmation: Participant information.
Learn more about the confirmation message
6) Automated waiting list

If an event reaches its maximum number of participants, Lyyti informs the next registrant that the event is full. They cannot register anymore but they can still sign up for the waiting list. If you have a limited capacity in the event, we recommend using the waiting list function!
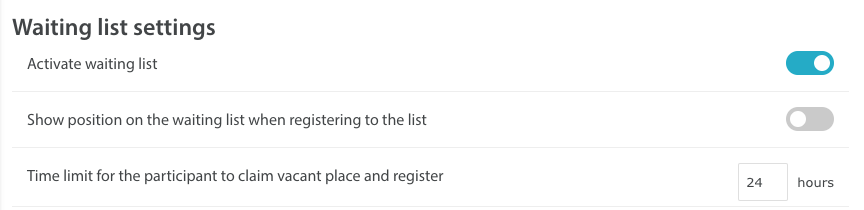
If a place becomes available, Lyyti will inform the first in line with an automatic e-mail. They can register within the time limit you as the organiser have set (in the image above, the limit is 48 hours). In case they don't register through the link Lyyti sent them, the place will be offered to the next in line. Lyyti's waiting list works automatically, so you don't have to do anything.
Learn more about the waiting list
7) What the registration looks like

The event is now ready! The event's open registration link can be found on this page "Registration link" in blue. You can publish this link wherever you want: a website, social media or send it from your own e-mail.
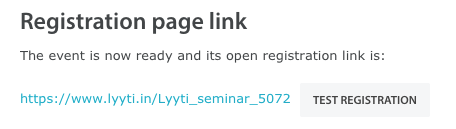
Time to give it a try! Click the actual registration link and test it out yourself to see what the registration process looks like to the registrants. Pay attention to the clarity, visual side and different messages in the process. What is the registration like to the participant? What works well, which parts should be different?
Send the link to your colleague as well and ask for their opinion! Feel free to test and edit the event - as long as the registration link is not sent to real participants, no harm can be done :)
What next?
How to inform participants about the event?
After the registration process is ready, it is time to think about the invitation channel. How will potential participants hear about the event? Is it an event that invitees may forward the invitation they will get? Or is the event only for a restricted audience?
Learn about invitation channels and event communications
How to keep track of registrations? How to share participant information to others?
Lyyti shows you the up-to-date registration situation, but what if your manager also wishes to know how many registrations you have received so far? What about the situation next week? Or what if you need to know how many and who are attending the gala dinner or different workshops?
Comments
0 comments
Please sign in to leave a comment.